18/6/2025
7 min
#1 – Incorrect or outdated Sitemap
When we help companies with Webflow development, we almost always start by reviewing the technical fundamentals – such as the sitemap and indexing.
You’ll usually find it here: yourdomain.com/sitemap.xml
(If you get an error message, it means the site lacks a defined sitemap – or the publishing didn’t go through).

A sitemap is basically a “map” of all important pages on your website. It helps Google’s bots (crawlers) quickly understand the content structure, which pages matter most, and in what order they should be prioritized.
Google usually finds pages anyway – even without a sitemap. But it takes longer, and there’s a higher risk that the wrong pages, like old test pages or style guides, show up in search results.
We often see issues when:
- Sites are built using templates and forget to remove example or demo pages
- Irrelevant pages (like cookie policies or design systems) are left published and indexable
Solution:
In Webflow, you can easily control what ends up in the sitemap via:
Pages → Page Settings → Site Search Settings → “Exclude this page from site search results”
By checking that box, you ensure the page won’t appear in the sitemap.

Note! Want to completely hide the page from Google? Don’t forget to add noindex in the SEO settings.
For full control: create a custom sitemap where you clearly define which pages should be indexed – and exclude the rest.
Tips for better control over indexing and your sitemap
- Submit your sitemap in Google Search Console when adding new pages
It helps Google find your pages faster – especially after major updates. - Check what Google has actually indexed
See which pages are indexed by searching: site:yourwebsite.com, e.g., site:goodguys.se (no spaces). - Manually double-check your sitemap
Check yourdomain.com/sitemap.xml to quickly see which pages are included. Do this after every major update.
Clear out unnecessary content
Pages you no longer need should not be published, indexable, or included in your sitemap. Put them in draft mode – and if the page is already indexed, make a 301 or 302 redirect.
#2 – Avoid duplicate content with canonical links
This is a small detail many miss – but it can have a big impact on your SEO: canonical links. Even though Webflow helps with the basics, you still need to know when the default settings are enough – and when you need to fine-tune things manually to avoid duplicate content or sending the wrong signals to Google. This is especially important if you have campaign pages or work with Google Ads, since you often create multiple versions of the same page.
What is a canonical link, really?
It tells search engines which version of a page is the primary one to index.
Common situations where canonical is needed:
- Similar blog posts with overlapping content
- Campaign pages that basically duplicate an original product or service
- Pagination (e.g., /blog?page=2)
- The same page with different sorting or filters in the URL (e.g., ?sort=newest, ?filter=sale)
The canonical link helps search engines understand which page to index – and minimizes the risk of duplicate content.
Step 1: Set a global canonical link
In Webflow, you can (and should) add a global canonical link that applies to your entire website. Do it here: Settings → SEO → Global Canonical Tag URL
Paste in your primary domain – the one you’ve marked as your main domain under Domains – with or without www.

Why it matters:
It’s especially important on pages where the content is largely identical but shown in different variations through filters or parameters (like blogs or e-commerce). Google may see each variation as a separate page, which can lead to duplicate content – and decreased visibility.
Examples of URL variations:
- /blog?page=2
- /cases?category=construction
- ?utm_campaign=summer-sale
Solution:
By using a global canonical tag, you point all these variations back to the main version of the page.
Step 2: Add a canonical link manually – when needed
If you have multiple pages with similar or duplicate content, you’ll need to manually specify which page is the original. This applies to things like blog posts that cover similar themes or products with nearly identical descriptions. Without a clear canonical, Google might get confused about which version to show in search results – which can hurt your visibility.
In Webflow, a manual tag will always override the global one.
Example:
You have two pages:
/product-a → original
/product-a-campaign → copy for advertising
On the campaign page, you should set a canonical pointing to the original page to avoid duplicate content issues.
How to do it in Webflow:
- Go to the Pages panel
- Select the copied page (e.g. the campaign page)
- Click Page Settings
- Scroll down to Page canonical URL
- Paste the full URL of the original page, for example:
https://yourdomain.com/product-a - Click Save
💡 This replaces the old method where you had to manually insert a canonical tag into the <head> using Custom Code.
Tips:
- Start by setting a global canonical – it’s simple and solves a lot of problems
- You can also spot duplicate content in Google Search Console under Indexing → Pages, where Google lists similar pages that may have been ignored
- Don’t forget to manually check pages with similar content
#3 – Multilingual sites: common SEO mistakes
Many Webflow websites with multiple languages – either through third-party services like Weglot or duplicated pages – miss important SEO settings.
The most common mistake?
Missing or incorrectly implemented hreflang tags.
Without these tags, Google doesn’t know which language version to show in search results, which can lead to, for example, the English page being shown to Swedish users – or vice versa.
URL structure – critical for SEO
Another common mistake is having all language versions on the same URL, like:
❌ goodguys.se/webflow-byra for both Swedish and English.
Better solution:
- goodguys.se/webflow-byra (Swedish)
- goodguys.se/en/webflow-agency (English)
This is crucial so that each language version can rank independently and be measured correctly in tools like Google Analytics or Google Tag Manager.
Smoother translation directly in Webflow
Many choose third-party solutions to quickly make a site multilingual – but this often comes with limitations. Since Webflow launched its own Localize feature, there’s now a simpler and smarter way to manage language versions directly in the Designer.
No workarounds – just:
- Better control over content and layout per language
- Faster loading times thanks to native integration
- Full SEO compatibility without extra code
- Smooth workflow directly in Webflow – no external platform needed
For those already working in Webflow, this is the most seamless option.

Don’t forget sharing – Open Graph
If you don’t have unique URLs and correct Open Graph data for each language, there’s a risk the wrong title, image, or description appears when someone shares your page – e.g., on LinkedIn or WhatsApp.
It might not directly impact your ranking – but it definitely affects your branding.
Tips:
- Check if your hreflang tags are working: [Hreflang-checker]
- See how your page appears when shared: [Open Graph-checker]
#4: Incorrect heading structure – a common SEO issue
An incorrect or poorly planned heading structure is something we often encounter on Webflow websites. It’s not just about using an H1 – it’s about ensuring the entire heading hierarchy from H1 to H6 is correctly set up. Many publish content without double-checking the structure, which can lead to unclear semantics and reduced understanding from search engines.
Common mistakes:
- No H1 on the page
- Multiple H1s on the same page
- Heading tags used out of order (e.g., H4 directly after H2)
- Important headings placed far down or missing semantic relevance
Google uses the heading structure to interpret the content, understand its hierarchy, and determine what’s most relevant. A poorly structured setup can impact how well your page is indexed – and ultimately your visibility in search results.
Webflow gives you the freedom to use any heading level you want, regardless of style. That’s why it’s extra important that you actively make sure the structure follows a logical order: a clear H1 followed by H2, H3, and so on – without skipping levels without reason.
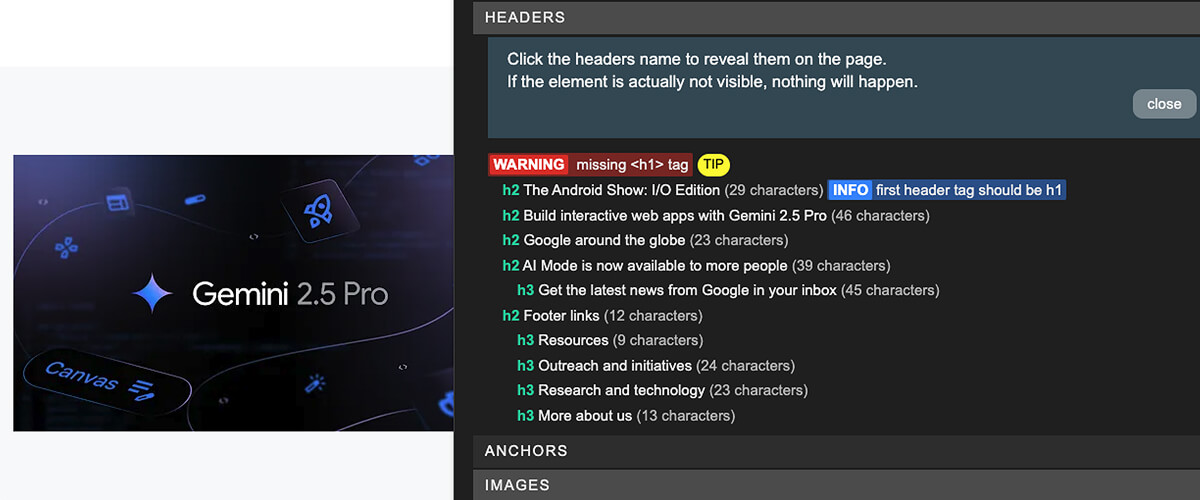
Tip:
Use Meta SEO Inspector (Chrome extension) to quickly check the heading structure on a page. You’ll find all heading tags under the “Headers” tab – perfect for a quick overview. Always check this after publishing a new blog post or page.
#5: Using Link Blocks instead of paragraph tags
In Webflow, it’s easy to end up placing an entire sentence inside a Link Block instead of using a regular paragraph tag with an embedded text link. This isn’t ideal – for either SEO or accessibility.
Why does it matter?
Paragraph tags (<p>) signal to Google that the content is body text – something to be interpreted and understood in context. If you place a link within a paragraph, Google gets a better understanding of what the link is about and how it relates to the rest of the content.
Link Blocks (<a> wrapping everything) are mainly used for visual link elements – like buttons, cards, or images. When you insert full sentences inside a Link Block without using <p>, you lose semantic structure. That makes it harder for both search engines and screen readers to interpret the content correctly.

Best practices:
- Use <p> + <a> for links in text content
- Use Link Blocks for visual links (e.g., cards, buttons, images)
Want a Webflow website that actually performs?
We offer a free SEO audit of your Webflow site – and the best part is, we also fix the SEO issues we find.
That way, you avoid common mistakes and get a website that not only looks great, but also loads fast and ranks high.
Webflow
Author

Table of content

